As an Amazon Associate I earn a small commission from qualifying purchases made using links from this website.
Imagine creating a new DIY Vertical Hydroponic Tower and transforming a tiny corner of your balcony, garage, or even your living room into a thriving, space-saving garden that produces fresh greens year-round—without breaking the bank. If you’re tired of sky-high grocery bills for organic produce or limited by a small yard, building a DIY vertical hydroponic tower on a budget could be your game-changer.
This innovative system lets you grow herbs, vegetables, and greens vertically, using water instead of soil, and it costs far less than commercial setups. In this definitive guide, we’ll walk you through every step to create your own affordable vertical hydroponic system, from gathering materials to harvesting your first crop. Whether you’re a beginner gardener or a seasoned DIY enthusiast, this tutorial will empower you to build a hydroponic grow tower that’s efficient, eco-friendly, and incredibly rewarding.
Hydroponics isn’t just a trend; it’s a revolution in home gardening. By ditching soil and delivering nutrients directly to plant roots via water, a DIY vertical hydroponic tower maximizes space, conserves water (up to 90% less than traditional gardening), and accelerates growth rates. Plants in these systems can mature 30-50% faster, yielding bountiful harvests in minimal footprints.
And the best part? You don’t need expensive kits. With smart shopping and simple tools, you can assemble a robust hydroponic tower for under $100-150, depending on scale. We’ll focus on budget-friendly options, ensuring your build is accessible and scalable. Get ready to dive into the world of vertical hydroponic gardening—your fresh salads await!
For additional informaation on the different types of hydroponic systems, check out the rest of our website @ verticalhydrotower.com
Before we grab our tools, let’s explore why a DIY vertical hydroponic tower stands out as the ultimate budget-friendly gardening solution. Traditional gardens require vast plots of land, constant weeding, and vulnerability to pests and weather. In contrast, vertical hydroponics stacks plants upward, turning unused vertical space into productive real estate. This method is perfect for urban dwellers, apartment renters, or anyone with limited outdoor access.
One major perk is cost savings. Commercial hydroponic towers can run $300-500 or more, but our DIY approach slashes that price tag dramatically. By sourcing everyday materials like PVC pipes and basic pumps, you’ll create a custom hydroponic grow tower tailored to your needs. Plus, hydroponics eliminates soil-borne diseases, reduces pesticide use, and allows for year-round indoor growing with optional grow lights.
Environmentally, it’s a win too. A DIY vertical hydroponic tower on a budget uses recirculating water systems, minimizing waste and promoting sustainability. Studies show hydroponic systems can produce up to 10 times more food per square foot than soil-based methods. If you’re passionate about self-sufficiency, this setup lets you grow nutrient-dense foods like lettuce, spinach, basil, and strawberries right at home. Intrigued? Let’s break down the essentials.
Success starts with planning. Determine your space: A basic 5-6 foot DIY vertical hydroponic tower fits in a 2×2 foot area, ideal for balconies or indoors. Consider plant count—our design supports 20-30 plants, but start small if you’re new.
Budget breakdown: Expect $50-100 for core components. Factor in electricity for the pump (minimal, about $1-2/month) and nutrients. Sunlight is free outdoors, but indoors, add LED grow lights for $20-50.
Key considerations:
Location: Sunny spot (6-8 hours daily) or under grow lights.
Water Source: Access to clean, dechlorinated water.
Plant Choices: Opt for fast-growers like leafy greens to see quick results in your hydroponic tower.
With planning done, let’s gather materials.
Sourcing budget materials is key to keeping your DIY vertical hydroponic tower affordable. We’ll use readily available items from hardware stores or online. Here’s a comprehensive list:
PVC Pipe (Main Tower Structure): A 4-inch diameter, 5-6 foot length of Schedule 40 PVC pipe forms the backbone. It’s durable, lightweight, and perfect for vertical hydroponic gardening. We recommend the VENTRAL PVC Pipe Sch 40 4 Inch Custom Length (3FT) for its affordability and ease of cutting—extend as needed for taller towers.
Net Pots: These hold your plants and allow roots to dangle into the nutrient solution. Get 20-30 3-inch pots for optimal spacing. The AC Infinity Net Cups 3-Inch, 25-Pack is a top pick—sturdy, reusable, and under $20.
Submersible Pump: This circulates nutrient-rich water up the tower. A small 200-400 GPH model suffices for budget builds. Check out the VIVOSUN 210GPH Submersible Pump—quiet, energy-efficient, and priced around $15.
Hydroponic Nutrients: Essential for plant health without soil. A balanced liquid formula like the General Hydroponics Flora Series provides all macro and micronutrients. Start with a quart set for $30-40; it’s versatile for veggies and herbs.
pH Meter: Maintaining pH (5.5-6.5) is crucial for nutrient uptake. The Bluelab pH Pen is reliable and user-friendly, costing about $100 but worth it for long-term success.
5-gallon bucket (reservoir)
PVC end caps, elbows, and glue
Rockwool cubes or clay pebbles (growing medium)
Drill with hole saw (2-3 inch)
Total estimated cost: $80-120. Pro tip: Shop sales or repurpose items to stay under budget.
Now, the exciting part—assembly! This process takes 1-2 hours and requires basic tools. Follow these steps for a foolproof hydroponic grow tower..
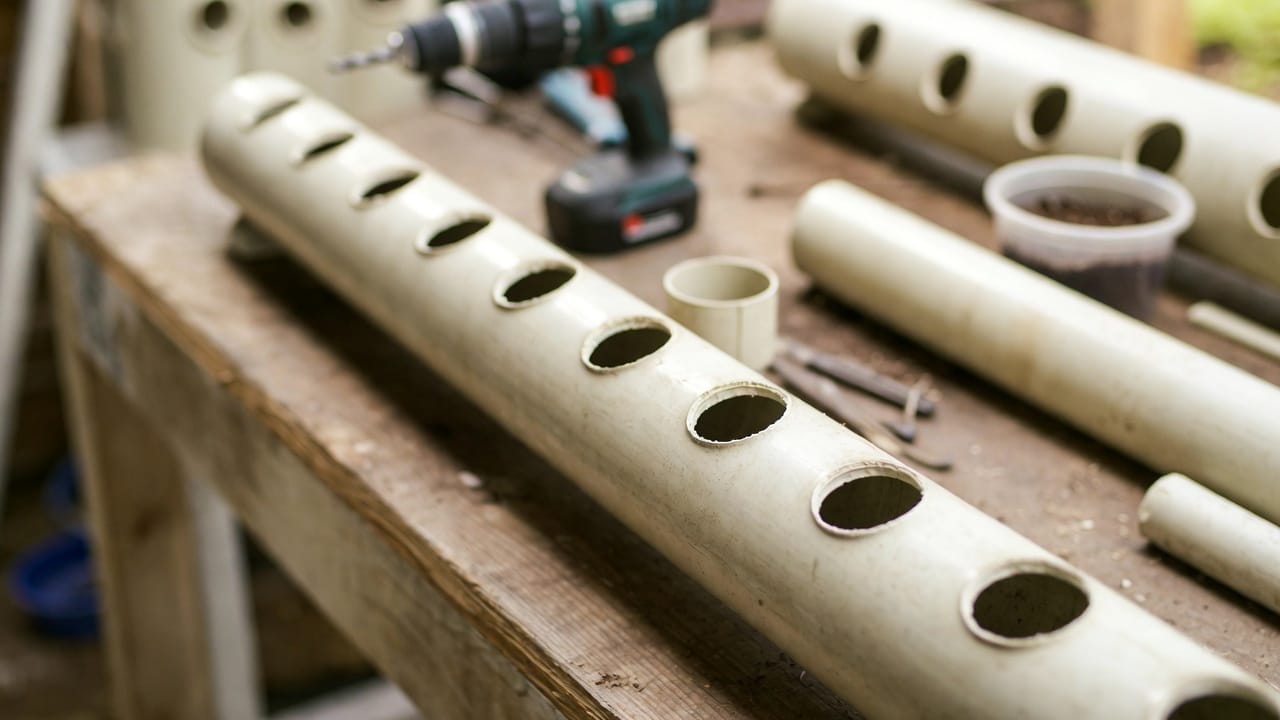
Cut your 4-inch PVC pipe to desired height (5-6 feet for beginners). Mark plant sites every 6-8 inches, staggering them for even light exposure. Using a hole saw, drill 2-3 inch holes for net pots. Sand edges smooth to avoid root damage. This creates the vertical framework of your DIY vertical hydroponic tower.

Attach a PVC end cap to the bottom of the pipe. Drill a small hole near the base for drainage back to the reservoir. Place the pipe upright in a 5-gallon bucket filled with water (your nutrient reservoir). Secure with brackets if needed for stability.
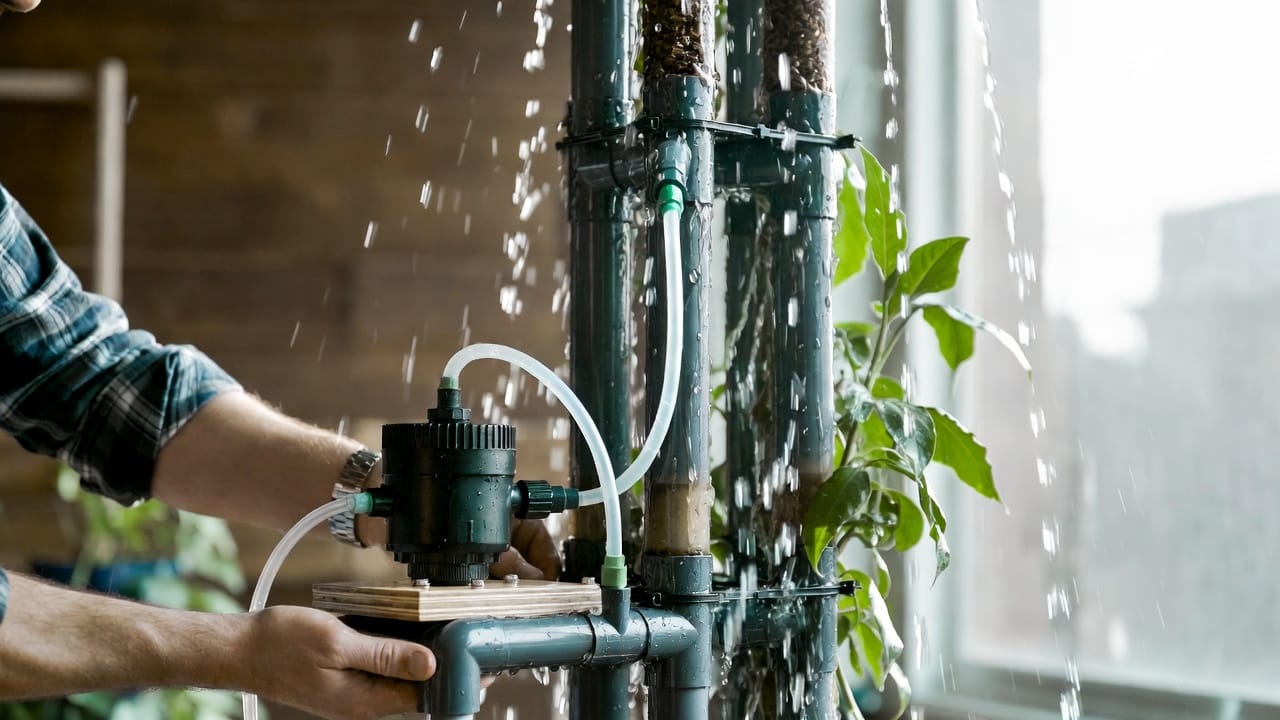
Connect the submersible pump in the bucket to a hose running up the pipe’s interior. At the top, add an elbow fitting to direct water downward, creating a cascading flow over roots. Use the VIVOSUN pump for reliable circulation—set it on a timer for 15-30 minutes every few hours.
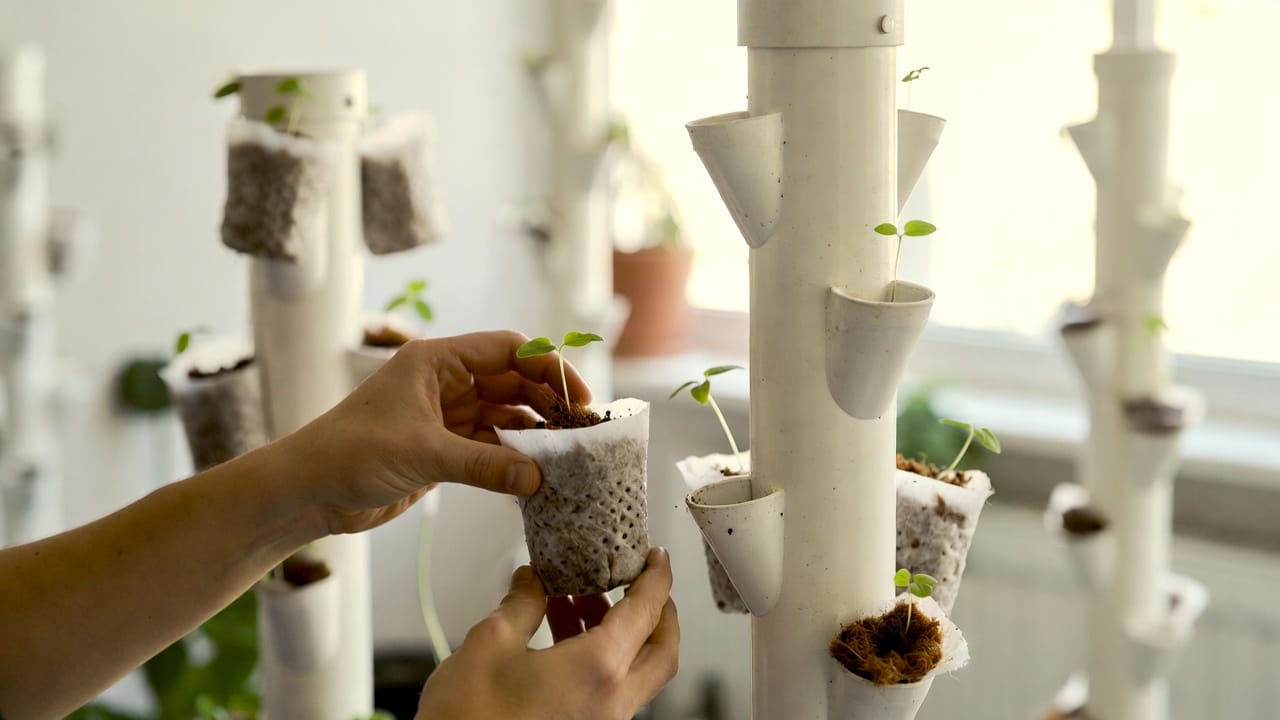
Insert net pots into the drilled holes. Fill with rockwool cubes soaked in pH-balanced water. Transplant seedlings (start from seeds in rockwool for best results). Ensure roots hang freely inside the pipe for optimal nutrient absorption.

Follow the General Hydroponics Flora Series instructions: Mix A, B, and C parts in dechlorinated water. Test pH with your Bluelab meter and adjust with pH up/down solutions (inexpensive and essential). Fill the reservoir and start the pump—watch the magic begin!

Outdoors, position for sunlight. Indoors, hang LED grow lights 12-18 inches above. Monitor daily: Check pH, nutrient levels (EC meter optional but helpful), and water temperature (68-72°F ideal).
With these steps, your affordable vertical hydroponic system is operational. Initial setup might seem daunting, but it’s straightforward and customizable.
Choosing the right plants maximizes your DIY vertical hydroponic tower’s potential. Focus on compact, fast-growing varieties:
Leafy Greens: Lettuce, spinach, kale—harvest in 4-6 weeks.
Herbs: Basil, mint, cilantro—aromatic and prolific.
Veggies: Strawberries, cherry tomatoes (support with trellises), peppers.
Avoid: Root veggies like carrots, as they need deeper systems.
Start with 4-6 plants per level, spacing for airflow to prevent mold. Rotate crops seasonally for continuous yields.
To make your build the definitive DIY vertical hydroponic tower, heed these expert tips:
Water Quality Matters: Use filtered or aged tap water to avoid chlorine buildup.
Nutrient Management: Change solution weekly; monitor for deficiencies (yellow leaves signal issues).
Pest Control: Hydroponics reduces pests, but inspect regularly. Neem oil is a natural fix.
Scaling on a Budget: Add towers side-by-side for expansion without major costs.
Energy Efficiency: Use solar-powered pumps if outdoors to cut electricity bills.
Troubleshooting: Clogged lines? Flush with clean water. Slow growth? Check light and pH.
Implementing these ensures bumper crops and minimal headaches.
Even pros slip up, so dodge these pitfalls:
Overcrowding: Too many plants compete for nutrients—space them 6-8 inches apart.
Ignoring pH: Fluctuations lock out nutrients; daily checks with your Bluelab pH Pen prevent this.
Poor Circulation: Weak pumps lead to stagnant water—opt for reliable models like VIVOSUN.
Skipping Leaks Check: Test your setup empty first to avoid floods.
Neglecting Maintenance: Weekly cleanings keep algae at bay.
By avoiding these, your hydroponic tower will thrive long-term.
A DIY vertical hydroponic tower on a budget requires minimal upkeep, but consistency is key. Weekly: Drain and refill reservoir, clean pumps, prune plants. Monthly: Deep clean pipes with hydrogen peroxide solution. Annually: Replace worn parts like hoses.
Track progress in a journal—note growth rates, yields, and adjustments. With proper care, expect 10-20 pounds of produce per cycle from a single tower.
Once hooked, expand! Add multiple towers for a full hydroponic farm. Integrate automation like smart timers or sensors for hands-off operation. For budgets under $200, build a 4-tower system yielding enough for a family.
Congratulations—you’ve now mastered building a DIY vertical hydroponic tower on a budget! This definitive guide equips you with everything from materials to maintenance, turning novice gardeners into hydroponic heroes. Enjoy the satisfaction of homegrown, chemical-free food while saving money and space. Start small, experiment, and watch your vertical hydroponic gardening skills soar. Fresh, sustainable abundance is just a build away—get growing today!
© 2026 VerticalHydroTower.com • Sustainable Hydroponic Farming