As an Amazon Associate I earn a small commission from qualifying purchases made using links from this website.
Ever dreamed of harvesting crisp lettuce, fragrant basil, or even ripe tomatoes right from your living room, without digging in dirt or battling weeds? That’s the allure of hydroponics—a soil-free growing method that’s exploding in popularity among home gardeners, urban dwellers, and sustainability enthusiasts. If you’re wondering how to build your own hydroponic system, you’re in the right spot.
This isn’t some skimpy tutorial; it’s the ultimate, step-by-step blueprint to creating a thriving setup from scratch. Whether you’re a total newbie tinkering in a small apartment or a seasoned grower scaling up your operation, we’ll walk you through everything you need to know. By the end, you’ll have the confidence to assemble a cost-effective, high-yield system that pumps out fresh produce year-round. Let’s dive in and turn that “what if” into a lush, green reality.
Building your own hydroponic system at home might sound high-tech, but it’s surprisingly accessible. Hydroponics involves growing plants in nutrient-rich water, delivering essentials directly to the roots for faster growth—up to 50% quicker than soil methods—and higher yields with less water. No more worrying about poor soil quality or seasonal limitations.
The best part? You can start simple with a DIY hydroponic system that costs under $100. As you learn how to build your own hydroponic system, you’ll discover it’s customizable to your space, budget, and goals. From compact countertop units to expansive vertical towers, the possibilities are endless. Ready to get your hands wet? We’ll start with the basics and build from there.
Before we grab the tools, let’s talk about why learning how to build your own hydroponic system is worth your time. Traditional gardening can be a hassle—think pests, unpredictable weather, and back-breaking labor. A homemade hydroponic setup sidesteps all that. You’ll use 90% less water, grow indoors or out, and harvest continuously.
For city folks in places like San Francisco, where space is premium, a vertical DIY hydroponic system maximizes every square foot. Plus, it’s eco-friendly: no chemical runoff, and you control what goes into your food.
Cost-wise, buying a pre-made kit can run $200+, but building your own hydroponic system at home slashes that in half. It’s also educational—tinkering teaches you about plant biology, water chemistry, and engineering. Families love it as a hands-on project; kids get excited watching roots dangle in clear water. If sustainability drives you, hydroponics reduces food miles—your salad travels from system to plate in minutes. Convinced? Let’s explore the types of systems you can build.
When figuring out how to build your own hydroponic system, the first decision is the type. Each has pros, cons, and complexity levels. We’ll focus on beginner-friendly options for your DIY hydroponic system.
DWC is perfect if you’re new to building your own hydroponic system. Plants sit in net pots suspended over oxygenated water—roots soak up nutrients directly. It’s passive, low-maintenance, and great for leafy greens. Pros: Simple setup, fast growth. Cons: Needs aeration to avoid root rot. Ideal for small spaces; you can build a basic DWC in an afternoon.
NFT channels a thin nutrient film over roots in sloped pipes. It’s efficient for herbs and veggies. When building your own hydroponic system like this, you’ll need a pump for circulation. Pros: High oxygen, space-saving. Cons: Pump failures can dry roots. Great for horizontal or vertical DIY hydroponic systems.
This floods trays periodically, then drains. It’s forgiving for beginners learning how to build your own hydroponic system. Pros: Good oxygenation, suits various plants. Cons: Timer required. Build it with buckets or trays for medium-scale grows.
The ultimate lazy build—non-circulating, passive system. Fill a container, let roots grow into air space as water level drops. Pros: No electricity, ultra-cheap. Cons: Best for short-cycle crops. Perfect entry into DIY hydroponic systems.
Roots hang in air, misted with nutrients. Advanced, but you can DIY with sprayers. Pros: Fastest growth, water-efficient. Cons: Clog-prone. If you’re ambitious, include this in your how to build your own hydroponic system plans.
For more on advanced options, check our Advanced Hydroponic Techniques.
Pick based on space and skill—start with DWC for your first build.
Gathering supplies is exciting when planning how to build your own hydroponic system. Focus on quality to avoid leaks or failures. Basic tools: drill, hole saw, measuring tape, PVC cutter. Materials vary by type, but here’s a universal list for a simple DWC setup for 4-6 plants.
Reservoir: 5-20 gallon bucket or tote ($10-20)
Net pots: 3-4 inch for plants (Hydrofarm Net Pots, pack of 50 for scalability)
Grow medium: Rockwool cubes or clay pebbles
Air pump and stones: For oxygenation (VIVOSUN Air Pump)
Nutrients: Essential for growth (General Hydroponics Flora Series)
pH kit: To balance water (General Hydroponics pH Control Kit)
Grow lights: If indoors (MARS HYDRO TS 600W LED Grow Light)
PVC pipes/tubing: For NFT or vertical builds
Timer: For pumps in active systems
Budget: $50-150 for basics. Source from hardware stores or online—Amazon’s great for quick delivery. These products are chosen for reliability and ease in your DIY hydroponic system build.
Let’s get hands-on with building your own hydroponic system. We’ll detail a 4-plant DWC—scale as needed.
Choose a light-proof container to prevent algae. Drill holes in the lid matching net pot size (use a hole saw). Space evenly for air flow. This is the heart of your DIY hydroponic system.
Attach air stones to tubing, connect to pump. Place stones at reservoir bottom for bubbles. In how to build your own hydroponic system, oxygenation is crucial—test run to ensure even distribution.
Fill reservoir with water, add nutrients per instructions (start half-strength). Test pH (5.5-6.5) with your kit, adjust with up/down solutions. This step in building your own hydroponic system ensures plants thrive from day one.
Germinate seeds in rockwool, transplant to net pots. Insert into lid holes—roots dangle in water. For your homemade hydroponic setup, choose easy starters like lettuce.
Position grow lights 18-24 inches above. Set timer for 16 hours on. In maintaining your build, check daily for levels, pH, and health.
Voila! Your first hydroponic system is live. For care tips, see Maintaining Your Hydroponic Garden.
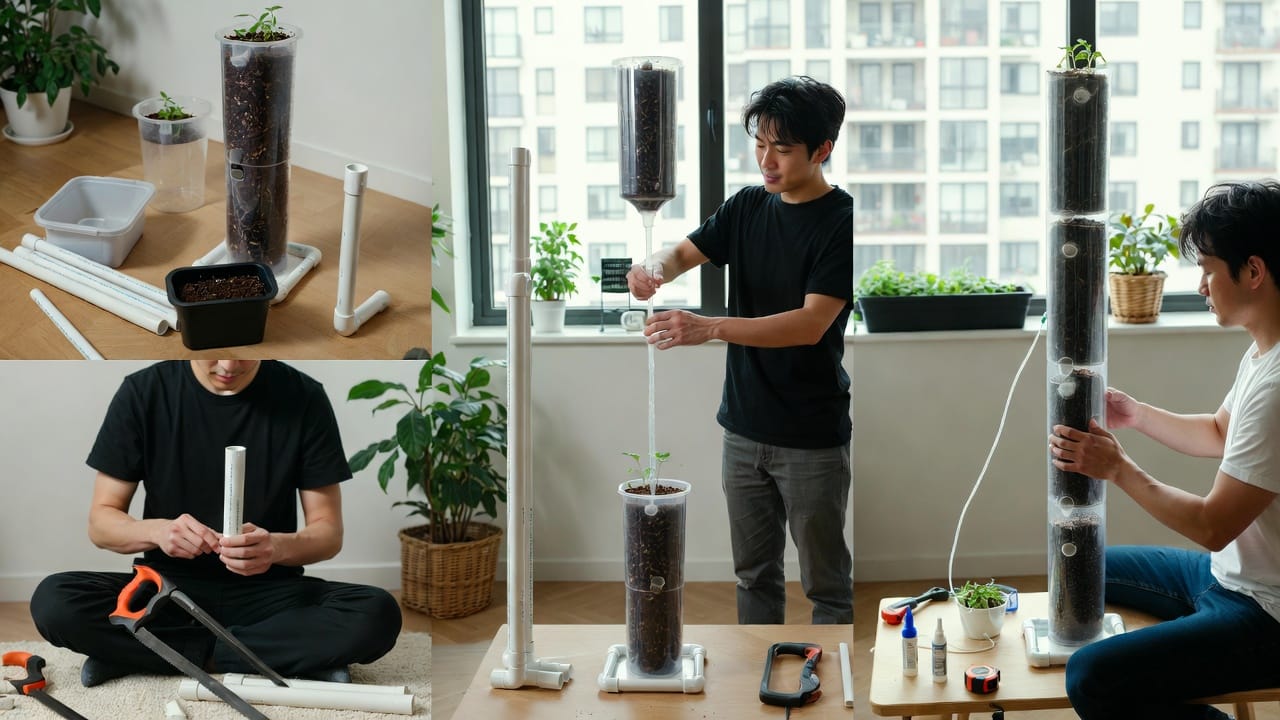
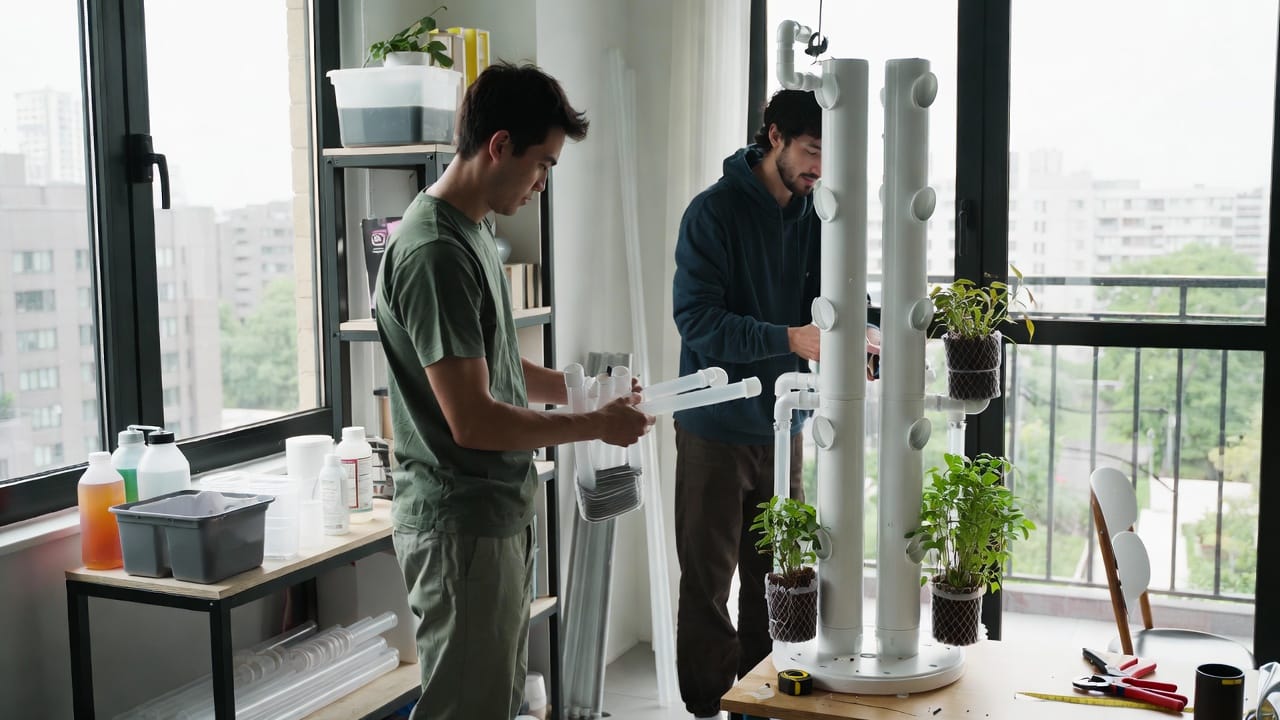
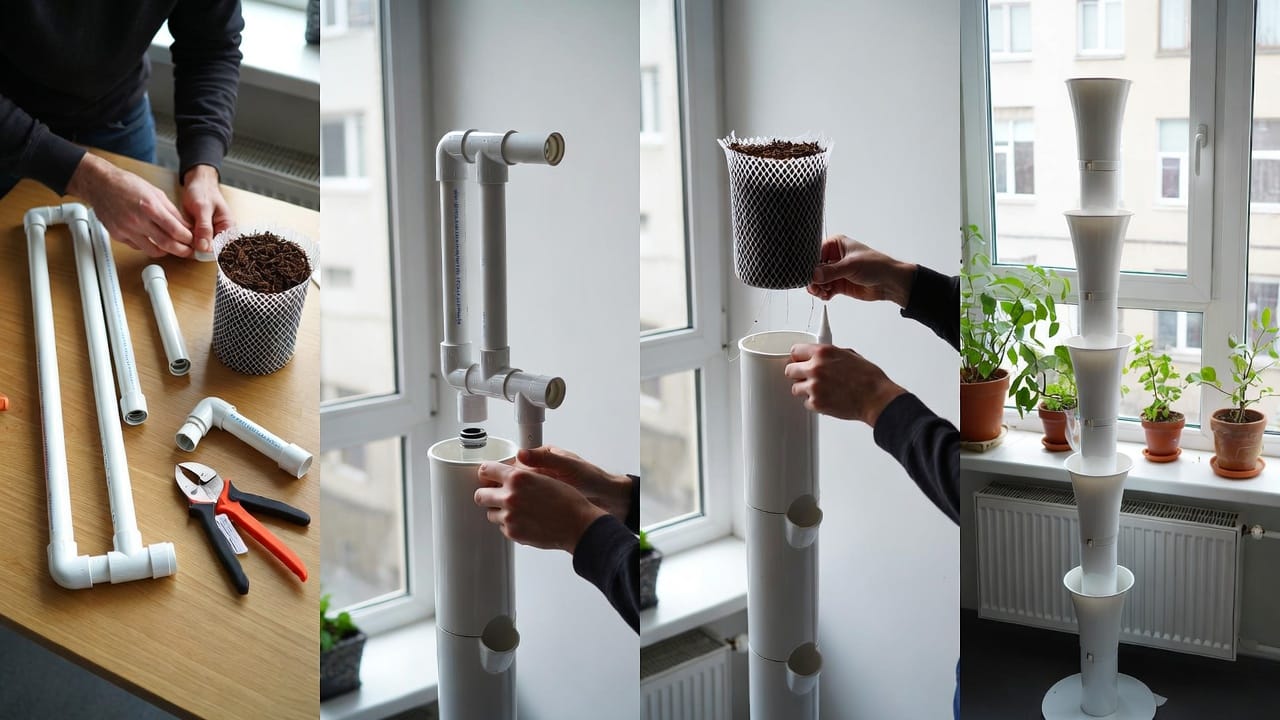
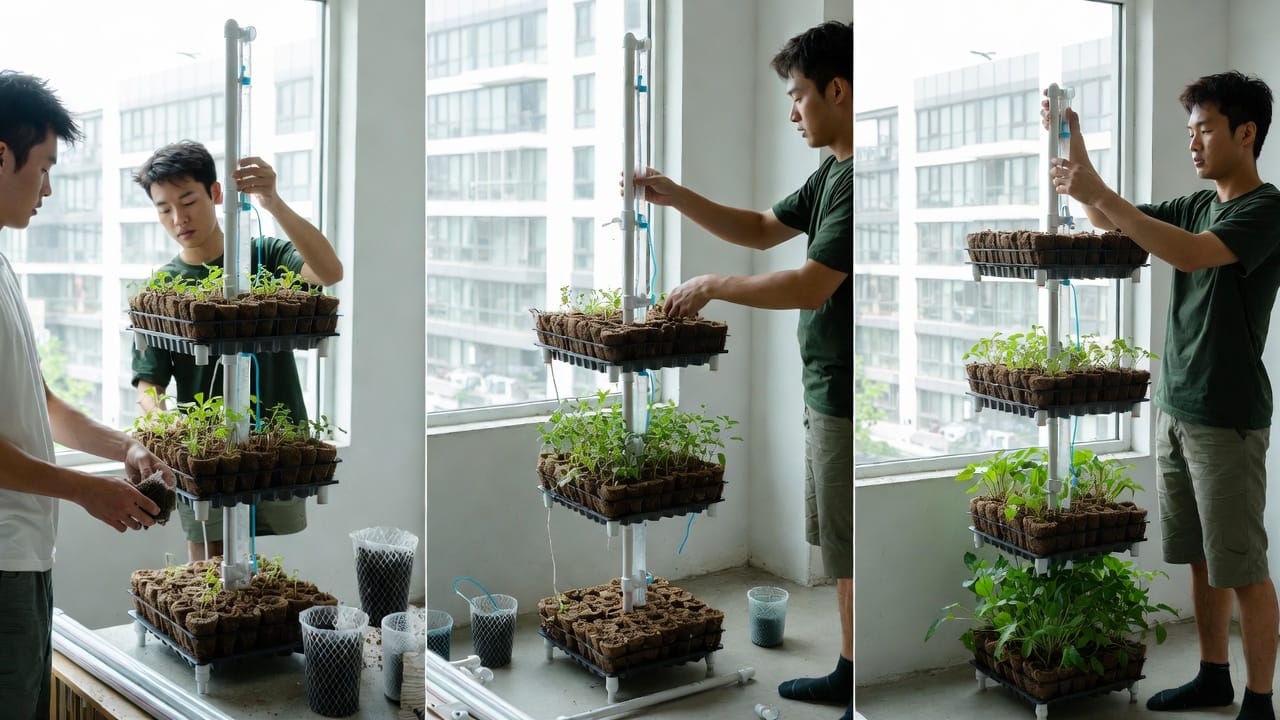
Once comfy with basics, level up by building your own hydroponic system vertically. Stack PVC pipes or use towers for space efficiency. Materials: 4-inch PVC, elbows, pump, reservoir.
Cut pipes to length (4-6 ft), drill plant holes every 8-12 inches.
Assemble tower with elbows, secure upright.
Run tubing from pump to top, letting solution cascade down.
Add net pots, nutrients, lights.
This DIY hydroponic system fits balconies or walls, yielding more in less space. Pros: Aesthetic, productive. Cons: Needs sturdy support.
For plant ideas, visit Best Plants for Vertical Hydroponic Systems.
For a dynamic setup, learn how to build your own hydroponic system with NFT. Use gutters or pipes sloped 1:40.
Steps:
Mount channels on frame.
Drill inlet/outlet holes.
Connect pump to feed nutrients.
Place plants in rockwool along channel.
Monitor flow to avoid dry spots. Great for herbs in your homemade hydroponic setup.
Even pros slip up. Avoid these in your DIY hydroponic system build:
Overcrowding: Space plants for air flow.
Ignoring pH: Leads to lockout.
Poor lighting: Causes weak growth.
Leaky fittings: Test everything dry first.
Starting too big: Begin small, expand.
Troubleshoot early—healthy systems rebound fast.
Maximize your build with these gems:
Use RO water if tap is hard.
Add beneficial bacteria for root health.
Rotate crops to prevent disease.
Automate with smart timers.
Experiment: Try strawberries in verticals.
Building your own hydroponic system is iterative—learn from each cycle.
Hydroponics aligns with green living—less water, no pesticides if organic. In urban areas, it cuts carbon footprints. As you build your own hydroponic system, you’re contributing to a sustainable future.
Sourcing budget materials is key to keeping your DIY vertical hydroponic tower affordable. We’ll use readily available items from hardware stores or online. Here’s a comprehensive list:
PVC Pipe (Main Tower Structure): A 4-inch diameter, 5-6 foot length of Schedule 40 PVC pipe forms the backbone. It’s durable, lightweight, and perfect for vertical hydroponic gardening. We recommend the VENTRAL PVC Pipe Sch 40 4 Inch Custom Length (3FT) for its affordability and ease of cutting—extend as needed for taller towers.
Net Pots: These hold your plants and allow roots to dangle into the nutrient solution. Get 20-30 3-inch pots for optimal spacing. The AC Infinity Net Cups 3-Inch, 25-Pack is a top pick—sturdy, reusable, and under $20.
Submersible Pump: This circulates nutrient-rich water up the tower. A small 200-400 GPH model suffices for budget builds. Check out the VIVOSUN 210GPH Submersible Pump—quiet, energy-efficient, and priced around $15.
Hydroponic Nutrients: Essential for plant health without soil. A balanced liquid formula like the General Hydroponics Flora Series provides all macro and micronutrients. Start with a quart set for $30-40; it’s versatile for veggies and herbs.
pH Meter: Maintaining pH (5.5-6.5) is crucial for nutrient uptake. The Bluelab pH Pen is reliable and user-friendly, costing about $100 but worth it for long-term success.
5-gallon bucket (reservoir)
PVC end caps, elbows, and glue
Rockwool cubes or clay pebbles (growing medium)
Drill with hole saw (2-3 inch)
Timer for pump
Total estimated cost: $80-120. Pro tip: Shop sales or repurpose items to stay under budget.
Once set up, explore hybrids like aquaponics. Join forums for tips. Track growth in a journal. The satisfaction of eating homegrown from your DIY hydroponic system is unmatched.
Hydroponics isn’t just a hobby; it’s a gateway to self-sufficiency. With this guide, you’ve got the tools to create something amazing. Grab those supplies, start building, and watch your garden come alive. Fresh eats await—happy growing!
© 2026 VerticalHydroTower.com • Sustainable Hydroponic Farming