
As an Amazon Associate I earn a small commission from qualifying purchases made using links from this website.
Living in a tiny apartment or a cozy backyard doesn’t mean you have to skip fresh greens. If you’re short on space but big on fresh produce dreams, DIY vertical hydroponics might just be your new best friend. This setup lets you grow plants upward, using water and nutrients instead of soil, and it’s surprisingly simple to pull off at home.
Imagine harvesting lettuce or herbs right from your wall without digging up your floor space. That’s the magic of DIY vertical hydroponics. It’s perfect for urban gardeners or anyone with a green thumb and limited room. In this post, we’ll dive into three straightforward ideas to get you started. No fancy equipment needed—just some basic supplies and a bit of creativity.
Whether you’re a beginner dipping your toes into hydroponics or looking to level up your setup, these space-saving garden ideas will help you build something efficient and rewarding. Let’s grow up, not out.
DIY vertical hydroponics takes the traditional hydroponic system and stacks it high. Hydroponics, in simple terms, means growing plants in a nutrient-rich water solution rather than soil. Vertical adds the height factor, turning walls, shelves, or towers into productive gardens.
Why go vertical? It maximizes every square inch. In a standard garden bed, plants spread out horizontally, eating up ground. But with DIY vertical hydroponics, you can fit dozens of plants in the space of a single shelf. It’s ideal for apartments, balconies, or even indoor spots under grow lights.
The core components are straightforward: a water reservoir, a pump to circulate nutrients, growing channels or pots, and a light source if you’re indoors. Don’t worry if that sounds technical— we’ll break it down with each idea.
One key benefit is efficiency. Plants grow faster in hydroponics because roots get exactly what they need, no soil to slow them down. Plus, it’s water-wise, using up to 90% less than traditional gardening. For more on the foundations, check out our basics of hydroponic farming guide.
Before jumping into the ideas, grab some essentials. You’ll need pH-balanced water, hydroponic nutrients, and perhaps a small submersible pump. A reliable starter nutrient mix like General Hydroponics Flora Series can kick things off right—it’s beginner-friendly and packed with what plants crave.
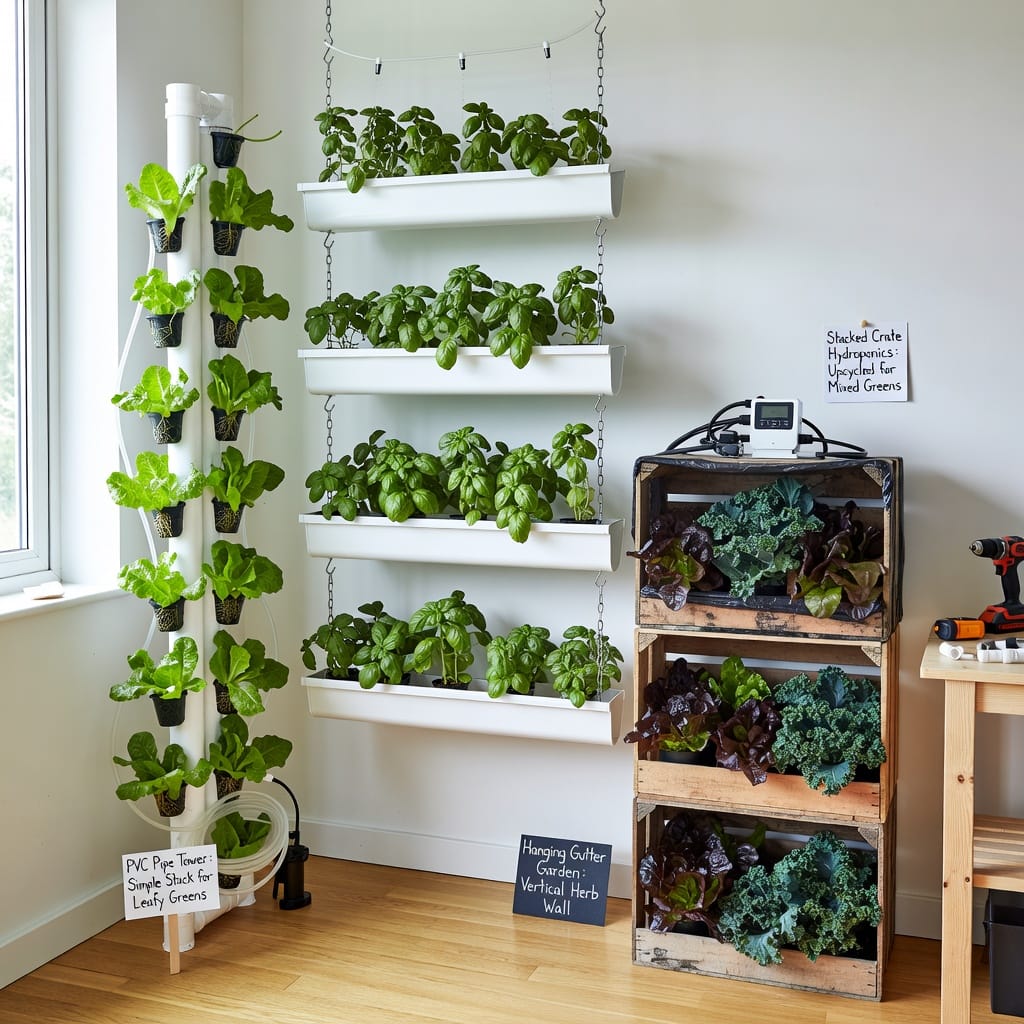
Let’s start with a classic: the wall-mounted PVC tower. This DIY vertical hydroponics project uses PVC pipes stacked like a chimney to create a towering garden. It’s effortless to build and perfect for small walls or fences.
Picture a slim tower hugging your kitchen wall, dripping with basil or strawberries. It’s space-saving because it only takes about a foot of floor depth while reaching up to six feet high. You can grow 20-30 plants in this setup, all without sprawling across your counter.
To build your PVC tower, gather these basics:
– 4-inch diameter PVC pipes (about 5-6 feet long for the main tower)
– PVC elbows and caps for connections
– A small submersible pump to circulate water
– Net pots or cups for plants
– Hydroponic growing medium like rockwool cubes
– Nutrient solution and a reservoir bucket
Don’t skimp on the pump—something compact like the VIVOSUN 400 GPH Submersible Pump works wonders for keeping water flowing smoothly.
First, cut your PVC pipe into sections. Drill holes along one side, spaced about 8-10 inches apart, big enough for net pots. These holes will hold your plants.
Stack the sections vertically, securing them with elbows at the base. Mount the whole thing on a sturdy wall bracket. Attach the bottom to your reservoir bucket.
Next, install the pump in the bucket. Run tubing up the tower’s center to the top. This creates a nutrient film technique (NFT) system, where a thin film of water trickles down, nourishing roots as it goes.
Fill the reservoir with water and add nutrients. Plug in the pump, and watch the magic. Plants go into the net pots with growing medium, roots dangling into the flow.
Start with easy growers like lettuce, spinach, or herbs. They thrive in DIY vertical hydroponics towers. Seedlings root quickly in rockwool, and within weeks, you’ll see growth.
Check pH levels weekly—aim for 5.5 to 6.5. A simple test kit helps here. Clean the system monthly to prevent clogs. If algae shows up, dim the lights or add a cover.
One pro tip: Position it near a south-facing window for natural light, or use LED grow lights for indoors. This setup not only saves space but also adds a fresh vibe to your room.
Troubleshooting? If plants wilt, it might be nutrient imbalance. Adjust based on leaf color—yellow means more nitrogen. With a little tweaking, your tower will produce steadily.
This wall-mounted design is a game-changer for city dwellers. It’s affordable, under $100 if you shop smart, and yields fresh picks year-round.
If walls are out but you’ve got ceiling space, try the hanging pocket garden. This DIY vertical hydroponics idea uses fabric pockets or felt bags suspended like a living curtain. It’s ultra-lightweight and swings gently, making it ideal for balconies or hanging from beams.
Why love this? It’s effortless—no drilling required. Pockets dangle in a chain, each holding 2-3 plants, stacking up to save floor room. Grow microgreens, flowers, or veggies in a cascade that fits tight spots.
This method draws from aeroponics principles, where roots get misted with nutrients. But we’ll keep it simple with a drip system. It’s space-saving genius for patios or even shower areas if you’re adventurous.
You’ll want:
– Durable felt pockets or grow bags (buy pre-made or sew your own)
– A sturdy hanging chain or rope
– Drip emitters and tubing
– A top reservoir for the nutrient mix
– Timer for automated watering
For the pockets, check out affordable options like the VIVOSUN 5-Pack 5-Gallon Grow Bags—they’re tough, promote air pruning for healthy roots, and adapt well to hanging setups.
Hang your chain from a secure hook, spacing pockets every foot or so. Fill each with a lightweight medium like coco coir.
Connect drip lines from a small rooftop reservoir. Use a timer to release nutrients every few hours, letting excess drain into a bottom catch basin that recirculates.
Insert plants into the pockets, ensuring roots reach the drips. Start small—herbs like mint or chives do great here.
Monitor moisture; pockets dry faster than towers, so adjust drip frequency. Sunlight is key—aim for 4-6 hours daily. Indoors? Supplement with full-spectrum lights.
Pests are rare in hydroponics, but watch for aphids. A gentle neem spray handles them. Rotate pockets occasionally for even growth.
This idea shines in its flexibility. Move it around as seasons change, and harvest easily without bending over. It’s not just functional; it turns any corner into a green oasis.
For those tight on time, automation makes it effortless. Set it and forget it, mostly. Yields? Expect a steady supply of greens for salads or garnishes.
Corners often go to waste, but not with this shelf-based DIY vertical hydroponics setup. Use stackable shelves in a corner to create tiers of growing trays. It’s stable, scalable, and blends into any room like furniture.
This is effortless for beginners because shelves provide ready structure. Add hydroponic channels on each level, and you’ve got a multi-story garden. Perfect for basements or offices, saving space while producing herbs, tomatoes, or peppers.
Vertical farming like this mimics commercial systems but on a home scale. It’s water-efficient and lets you grow upward in unused nooks.
Stock up on:
– Wire shelving units (adjustable height)
– Shallow trays or gutters for each shelf
– PVC or plastic channels for plant rows
– LED grow lights if natural light is low
– Air stones for oxygenation
A solid shelf unit, such as the Seville Classics 5-Tier Wire Shelving, offers strength and easy assembly—ideal for supporting wet trays without sagging.
Assemble the shelves in your corner, spacing tiers 12-18 inches apart for plant height. Line each with gutters sloped for drainage.
Install a pump at the base to push water up via tubing, then let it flow back down through overflow. This deep water culture (DWC) variant keeps roots submerged gently.
Place net pots in the channels, add medium, and plant. Connect lights overhead for even coverage.
Choose compact varieties: cherry tomatoes or kale fit well. Change the nutrient solution bi-weekly to keep things fresh.
Ventilation matters—add a small fan to prevent mold. Temperature should hover 65-75°F.
Harvest from the bottom up to avoid stressing upper plants. This setup’s modularity means you can expand as you go.
If issues arise, like root rot, ensure good airflow and clean filters. With routine checks, it’ll hum along beautifully.
This corner system feels integrated, not obtrusive. It’s a quiet way to bring nature indoors, yielding enough for family meals.
Jumping into DIY vertical hydroponics is exciting, but bumps happen. Power outages can halt pumps—keep a backup battery handy. Nutrient burn from overfeeding shows as crispy leaves; dilute and flush.
Lighting is crucial. For indoors, full-spectrum LEDs mimic sun. Outdoors, shield from harsh rays to avoid scorching.
Sustainability tip: Reuse graywater if clean, cutting bills. Track growth with a journal to refine your system.
For deeper dives into vertical farming benefits, the University of Minnesota’s extension guide on hydroponic systems offers solid research-backed advice.
Scale up gradually. Start with one idea, master it, then combine. Your space will thank you with bountiful, homegrown bounty.
These projects show how DIY vertical hydroponics opens doors to fresh eating without the sprawl. Whether it’s a tower, pockets, or shelves, pick one that fits your spot and dive in. Soon, you’ll wonder how you ever gardened any other way. Happy growing!